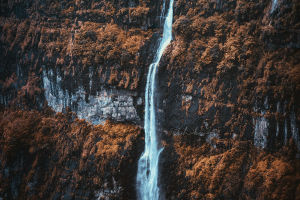
Waterfalls are stunning natural phenomena, and many of them have become popular tourist destinations.
They are formed through the process of river erosion, where continuous narrowing of the river channel increases the speed of the water and the height of the cliffs the water flows over.
The result is the creation of a waterfall. Many people are eager to learn how to photograph waterfalls, as these natural landscapes offer unique and captivating beauty. Understanding how to capture waterfalls is essential, especially for photographers involved in landscape photography.
Photographing waterfalls can be tricky—sometimes the fast-moving water can cause blurry or misty images. The challenges faced when photographing waterfalls make it a particularly interesting subject to capture. To help you capture stunning waterfall photographs, here are some helpful tips on how to photograph waterfalls!
1. Adjusting Shutter Speed
Waterfalls vary greatly in speed, and accordingly, shutter speed settings will differ depending on the waterfall you're photographing. To capture the movement of the water, use a fast shutter speed, such as 0.3 seconds. It’s also beneficial to use the continuous shot mode, so multiple frames are captured with a single press of the shutter.
This allows you to choose the best shot from several frames. If 0.3 seconds doesn't produce the desired effect, you can experiment with longer shutter speeds, such as 1 second or more, to get the right look.
2. Use a Tripod
Using a tripod is essential for minimizing blur or mist in your photos. Why is a tripod important? Holding the camera by hand often results in slight movements, either vertical or horizontal, making the image unstable. This instability can lead to blurry or misty effects in the photo.
While some people avoid using a tripod because of its size and the hassle of carrying it around, it is an important tool for ensuring sharp and steady shots. If you don't have a tripod or prefer not to carry one, look for a stable surface, such as stacked rocks, to rest your camera on.
3. Use Filters
In addition to a tripod, using filters can greatly improve your waterfall photography. If you have them, a neutral density (ND) filter can help adjust the color effects of the waterfall, making your images more visually appealing. Another useful filter is a Circular Polarizer, which reduces light reflection, thus enhancing the quality of the shot. This filter helps reduce reflections off wet rocks, water surfaces, and foliage. It also boosts color saturation, making the image clearer and more vibrant.
4. Set the ISO
When photographing waterfalls during the daytime, it's essential to set the ISO as low as possible, typically around ISO 100 or lower if your camera allows it. A low ISO reduces the camera's sensitivity, which allows for slower shutter speeds. Avoid using high ISO settings, as this can introduce noise, which can degrade the quality of your waterfall photos.
5. Adjust the Aperture
Setting the aperture correctly is crucial for capturing high-quality waterfall images. For the best results, use a small aperture setting, which will lengthen the exposure time and create a greater depth of field. A narrow aperture allows for more of the scene to be in focus, from the closest water droplets to the distant landscape, ensuring a detailed and sharp photograph.
Ideal Timing for Waterfall Photography
The best times to photograph waterfalls are either early in the morning, just after sunrise, or during the late afternoon or evening, as the lighting during these times is softer and more flattering. You should also take time to find interesting compositions and experiment with different angles and perspectives. Creativity plays a significant role in achieving beautiful and unique waterfall photographs.
Lykkers, to capture stunning waterfall photographs, it's important to understand how to adjust settings such as shutter speed, aperture, and ISO, while also considering the use of a tripod and filters. Moreover, choosing the right time and location to photograph, and experimenting with composition and angles, will help you create visually striking images. Always plan your photography session in advance for the best possible results!
10 Tips for BETTER Waterfall Photography
Video by Photo Tom