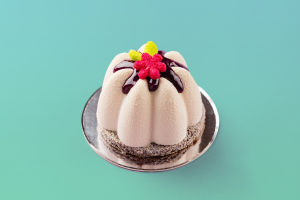
Mini mousse cakes are the perfect balance of elegance, flavor, and texture.
These bite-sized treats feature a delicate mousse layer atop a buttery, crumbly base, making them the ideal dessert for parties, special occasions, or just because you deserve a little indulgence.
Whether you’re a seasoned baker or a beginner, this recipe will guide you step by step through the process of creating these delightful mini cakes. With rich flavors, a light, airy texture, and a sophisticated presentation, mini mousse cakes are sure to steal the show. In this guide, we’ll break down the steps to make these mouthwatering cakes.
1. Ingredients for Mini Mousse Cakes
Before you start, make sure you have all the ingredients ready. This recipe will yield approximately 8-10 mini mousse cakes, depending on the size of your molds. Here’s what you’ll need:
For the Crust:
① 1 cup graham crumbs (or digestive biscuit crumbs)
② 1 cup granulated sugar
③ 1 cup unsalted butter, melted
For the Mousse:
① 1 cup heavy cream
② 8 oz cream cheese, softened
③ 1cup powdered sugar
④ 1 teaspoon vanilla extract
⑤ 1 tablespoon gelatin powder
⑥ 2 tablespoons water (for blooming the gelatin)
⑦ 1 cup milk (whole milk preferred)
For Decoration:
① Fresh berries (strawberries, raspberries, or blueberries)
② Whipped cream
③ Chocolate shavings or cocoa powder for dusting
2. Step-by-Step Instructions for Making Mini Mousse Cakes
Now that you have your ingredients, let’s walk through the process of making these elegant desserts.
Step 1: Prepare the Crust
① In a bowl, combine the graham crumbs, granulated sugar, and melted butter. Stir well until the mixture resembles wet sand.
② Divide the mixture evenly among your mini cake molds or tart pans (you can use individual silicone molds, a muffin tin, or even mini springform pans).
③ Press the mixture firmly into the bottom of each mold to form an even crust.
④ Place the molds in the refrigerator for at least 30 minutes to allow the crust to firm up.
Step 2: Bloom the Gelatin
① In a small bowl, add the gelatin powder and pour in 3 tablespoons of water. Let the gelatin bloom (absorb the water) for about 5 minutes. It will become a thick, gel-like texture.
② After blooming, gently heat the gelatin mixture in the microwave for 10-15 seconds or over low heat on the stovetop until fully dissolved. Set aside to cool slightly.
Step 3: Make the Mousse
① In a large bowl, beat the softened cream cheese with the powdered sugar and vanilla extract until smooth and creamy.
② In a separate mixing bowl, whip the heavy cream until soft peaks form. Be careful not to overwhip—this can cause the cream to separate.
③ Once the whipped cream is ready, gently fold it into the cream cheese mixture using a spatula. The goal is to keep the whipped cream fluffy and light.
④ Add the cooled gelatin mixture to the mousse base and stir to combine. If you’re adding fruit puree or melted chocolate, fold it in at this stage.
⑤ Spoon the mousse mixture over the chilled graham crusts in each mold. Smooth the tops with a spatula for a neat, even layer.
⑥ Refrigerate the mousse cakes for at least 3-4 hours or overnight, allowing them to set and become firm.
Step 4: Decorate and Serve
① Once the mousse cakes have fully set, carefully remove them from their molds. If you used a muffin tin, you may need to carefully run an item around the edges to loosen the cakes.
② Decorate the top of each mini mousse cake with fresh berries, whipped cream, or a dusting of cocoa powder or chocolate shavings for an added touch of elegance.
Mini mousse cakes are delightful and sophisticated desserts that are perfect for any occasion. With their light, airy texture and rich flavor, they are sure to impress your guests and satisfy your sweet cravings. By following these simple steps and using fresh, high-quality ingredients, you can easily create these beautiful treats at home. Whether you opt for a fruity mousse, a classic chocolate version, or a unique flavor combination, the possibilities are endless.


