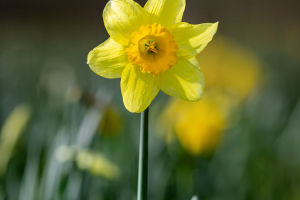
Looking for a bright, cheerful addition to your spring garden, Lykkers? Daffodils, with their vibrant yellow blooms and easy-going nature, make for an ideal choice that brings warmth and color to any outdoor space.
Let’s dive into the essentials of planting, nurturing, and enjoying these stunning flowers for years to come!
1. Choosing the Right Spot for Your Daffodils
Daffodils thrive best when planted in areas that receive plenty of sunlight, ideally six hours or more per day, which helps ensure strong, beautiful blooms. If you’re short on fully sunny spaces, a partially shaded area will work too, though it might reduce bloom intensity slightly. Avoid spots that are too shady, as this could result in weaker plants and fewer flowers.
2. Preparing the Soil for Optimal Growth
Daffodils prefer well-draining soil that is moderately rich and ideally slightly acidic to neutral in pH (6.0-7.0). To prepare your soil, start by loosening it to about 12 inches deep and mix in compost or organic matter to improve drainage and add nutrients. Heavy clay soils retain too much moisture, which can cause bulbs to rot, so if you have clay soil, consider amending it with sand or planting in raised beds.
3. Planting Daffodil Bulbs at the Right Time
The best time to plant daffodil bulbs is in early fall, about six weeks before the first hard frost, to give the roots time to establish before winter. Plant each bulb about 6 inches deep with the pointed end facing upward, spacing them 3 to 6 inches apart to allow room for growth. For a naturalized effect, plant bulbs in clusters or randomly scatter them rather than in precise rows.
4. Watering Daffodils: Finding the Right Balance
Daffodils have moderate water needs and, once established, are quite drought-tolerant. After planting, give the bulbs a thorough watering to encourage root growth, but avoid over-watering as this can lead to bulb rot. During the growing season, water occasionally to keep the soil moist, but allow it to dry slightly between watering sessions to prevent waterlogging.
5. Seasonal Care and Maintenance to Keep Blooms Healthy
After your daffodils bloom, it’s important to let the foliage die back naturally, as this allows the plant to store energy in the bulb for next year’s flowers. Deadhead or remove spent blooms to keep your garden tidy, but leave the leaves intact until they yellow and wilt, which usually takes several weeks. This process ensures healthy, robust daffodils that return each spring.
6. Protecting Daffodils from Pests and Diseases
Daffodils are relatively pest-resistant due to the natural toxins in their bulbs, which deter many common garden pests. However, they can sometimes fall victim to fungal diseases if planted in overly wet conditions. Ensure good air circulation and proper drainage to minimize the risk, and avoid overcrowding, which can lead to disease. If you see signs of fungal infection, consider removing the affected plants to protect the others.
7. Preparing Daffodils for Next Season’s Blooms
To prevent overcrowding, which can reduce flower production, consider digging up and dividing your daffodil bulbs every three to five years. Once the foliage has died back, carefully dig up the bulbs, separate any new ones that have formed, and store extras in a cool, dry place until fall planting. With a bit of attention, your daffodils will return each spring, adding color and joy to your garden.
Daffodils are resilient, easy to care for, and a true sign of spring’s arrival. With just a little care, your garden will be filled with radiant blooms that make a lasting impression!
Caring for Daffodils Before and After They Flower 💛
The video by Spoken Garden


